With version 2.7.1, docx4j – a library for manipulating Word docx, Powerpoint pptx, and Excel xlsx xml files in Java – and all its dependencies, are available from Maven Central.
This makes it really easy to get going with docx4j. With Eclipse and m2eclipse installed, you just add docx4j, and you’re done. No need to mess around with manually installing jars, setting class paths etc.
This post demonstrates that, starting with a fresh OS (Win 7 is used, but these steps would work equally well on OSX or Linux).
Step 1 – Install the JDK
For the purposes of this article, I used JDK 7, but docx4j works with Java 6 and 1.5.
Step 2 – Install Eclipse Indigo (3.7.1)
I normally download the version for J2EE developers. Unzip it and run eclipse
Step 3 – Install m2eclipse.
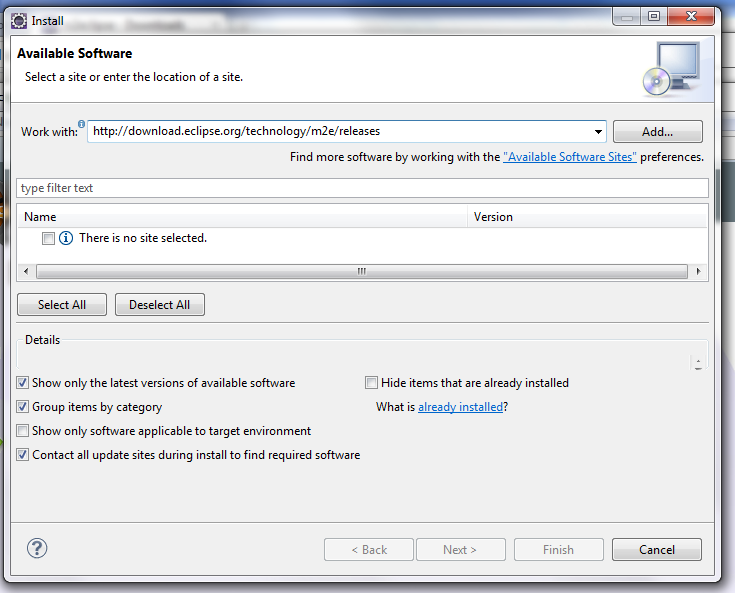
In Eclipse, click Help > Install New Software.
Type “http://download.eclipse.org/technology/m2e/releases” in the “Work with” field as shown:
then follow the prompts.
Step 4 – Create your Maven project
In Eclipse, File > New > Project.., then choose Maven project
You should see:
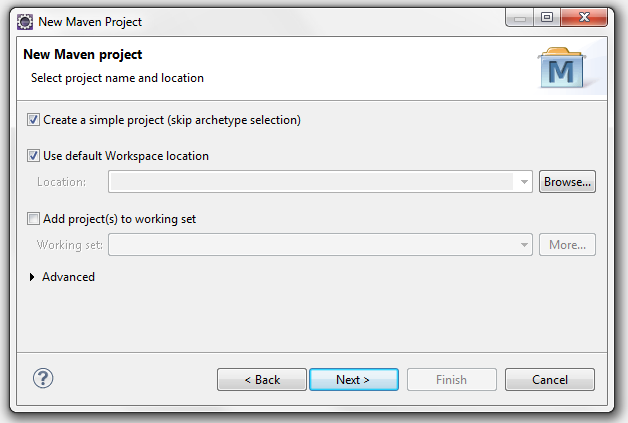
Check “Create a simple project (skip archetype selection)” then press next.
Allocate group and artifact id (what you choose as your artifact id will become the name of your new project in Eclipse):
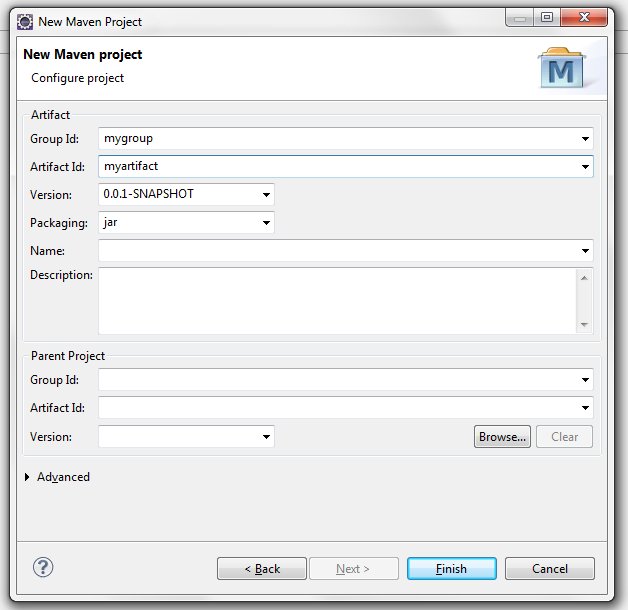
Press finish
This will create a project with directories using Maven conventions:
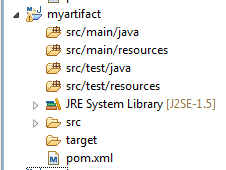
(Note: If your starting point is a new or existing Java project in Eclipse, you can right click on the project, then choose Configure > Convert to Maven project)
Step 5 – Add docx4j to your POM
Double Click on pom.xml
Next click on the dependencies tab, then click the “add dependency” button, and enter the docx4j coordinates as shown in the image below:
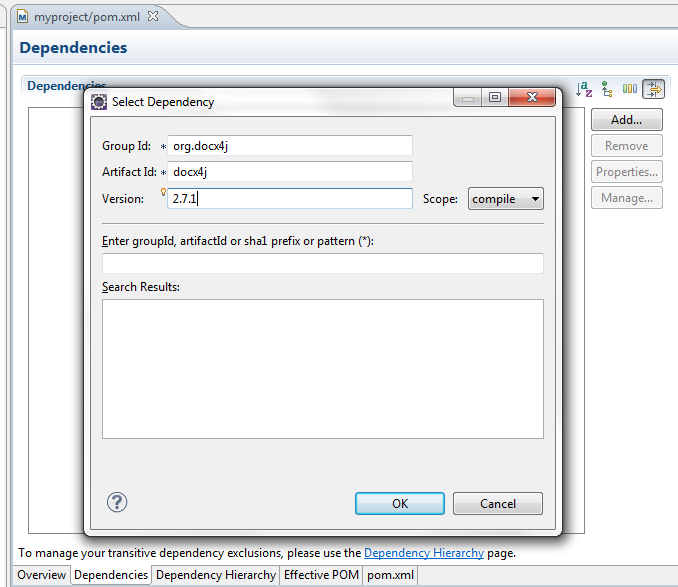
The result is this pom:
<project xmlns="http://maven.apache.org/POM/4.0.0" xmlns:xsi="http://www.w3.org/2001/XMLSchema-instance" xsi:schemaLocation="http://maven.apache.org/POM/4.0.0 http://maven.apache.org/xsd/maven-4.0.0.xsd">
  <modelVersion>4.0.0</modelVersion>
  <groupId>mygroup</groupId>
  <artifactId>myartifact</artifactId>
  <version>0.0.1-SNAPSHOT</version>
  <dependencies>
  	<dependency>
  		<groupId>org.docx4j</groupId>
  		<artifactId>docx4j</artifactId>
  		<version>2.7.1</version>
  	</dependency>
  </dependencies>
</project>
Ctrl-S to save it.
m2eclipse may take some time to download the dependencies.
When it has finished, you should be able to see them:
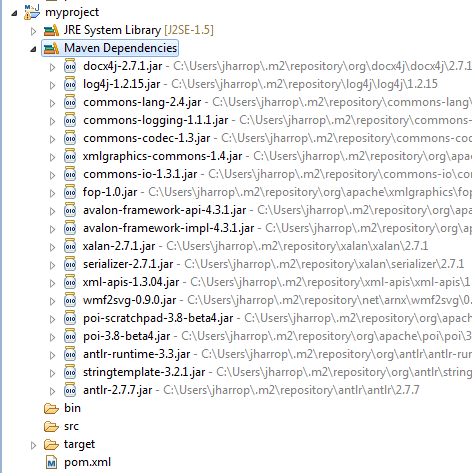
Step 6 – Create HelloMavenCentral.java
If you made a Maven project as per step 4 above, you should already have src/main/java on your build path.
If not, create the folder and add it.
Now add a new class:
import org.docx4j.openpackaging.packages.WordprocessingMLPackage;

public class HelloMavenCentral {

	public static void main(String[] args) throws Exception {

		WordprocessingMLPackage wordMLPackage = WordprocessingMLPackage.createPackage();

		wordMLPackage.getMainDocumentPart()
			.addStyledParagraphOfText("Title", "Hello Maven Central");

		wordMLPackage.getMainDocumentPart().addParagraphOfText("from docx4j!");

		// Now save it
		wordMLPackage.save(new java.io.File(System.getProperty("user.dir") + "/helloMavenCentral.docx") );

	}
}
Step 7 – Click Run
When you click run, all being well, a new docx called helloMavenCentral.docx will be saved.
You can open it in Word (or anything else which can read docx), or unzip it to inspect its contents.
Step 8 – Adding docx4j.properties
One final thing. If you plan on creating documents from scratch using docx4j, it is useful to set paper size etc, via docx4j.properties. Put something like the following on your path:
# Page size: use a value from org.docx4j.model.structure.PageSizePaper enum
# eg A4, LETTER
docx4j.PageSize=LETTER
# Page size: use a value from org.docx4j.model.structure.MarginsWellKnown enum
docx4j.PageMargins=NORMAL
docx4j.PageOrientationLandscape=false

# Page size: use a value from org.pptx4j.model.SlideSizesWellKnown enum
# eg A4, LETTER
pptx4j.PageSize=LETTER
pptx4j.PageOrientationLandscape=false

# These will be injected into docProps/app.xml
# if App.Write=true
docx4j.App.write=true
docx4j.Application=docx4j
docx4j.AppVersion=2.7.1
# of the form XX.YYYY where X and Y represent numerical values

# These will be injected into docProps/core.xml
docx4j.dc.write=true
docx4j.dc.creator.value=docx4j
docx4j.dc.lastModifiedBy.value=docx4j

#
#docx4j.McPreprocessor=true

# If you haven't configured log4j yourself
# docx4j will autoconfigure it.  Set this to true to disable that
docx4j.Log4j.Configurator.disabled=false
And that’s it. For more information on docx4j, see our Getting Started document.
Please click the +1 button if you found this article helpful.


