Archive for March, 2018

Docx4j and WebSphere 2018

March 27th, 2018 by Jason

TLDR

Current 3.3.x Docx4j works with WebSphere versions 8.5.5.9 and 9.0.0.5 in WebSphere’s default configuration (tested with IBM Java 8, which is not the default in WebSphere 8.5.5.9).

docx4j 3.3.7 contains an important fix for errorsCount where XLXP2 is in use with fallback JAXBContext of Sun/Oracle or reference implementation (see below for context).

Scope/Assumptions

Our testing was based around the following assumptions:

  • IBM JDK (not Sun/Oracle)
  • IBM JAXB (see below)
  • Xalan is available for use via System.setProperty(“javax.xml.transform.TransformerFactory”, org.apache.xalan.transformer.TransformerImpl)

Out of Scope of testing: OSGi. Others have done some work on OSGi in the past though; see https://github.com/uncleit/docx4j-osgi/blob/master/pom.xml or https://github.com/kimios

JAXB Background

IBM has their own proprietary JAXB implementation. By default, WebSphere uses com.ibm.xml.xlxp2.jaxb, which has the concept of fallback/ MarshallerProxy. The actual implementation it uses is in com.ibm.jaxb.tools.jar.

It is possible to configure WebSphere to instead use the JAXB implementation in the Sun/Oracle JRE, but usually you would not do this if you are using the IBM JDK.  Alternatively, your application could use MOXy JAXB (by including the relevant jars).

Here we tested with WebSphere’s default, namely:

Primary JAXBContext:
bundleresource://138.fwk797973828/com/ibm/xml/xlxp2/jaxb/JAXBContextImpl.class,
Version: 1.6.2-jaxb,
Fallback JAXBContext:
bundleresource://11.fwk797973828/com/ibm/jtc/jax/xml/bind/v2/runtime/JAXBContextImpl.class Build-Id: null

For more information, see https://stackoverflow.com/questions/48700004/does-webspheres-jaxb-marshallerproxy-use-the-reference-implementation

WebSphere has property: com.ibm.xml.xlxp.jaxb.opti.level (see https://www.ibm.com/support/knowledgecenter/en/SSAW57_8.0.0/com.ibm.websphere.nd.doc/info/ae/ae/xrun_jvm.html#com.ibm.xml.xlxp.jaxb.opti.level ):

  • At level=0, optimization methods are not enabled;
  • At level=3 (default), both unmarshalling and marshalling optimization methods are enabled.

In our testing, we used values 0 and 3 (or not set).

WebSphere has several other JAXB related properties which we left at their default settings.

ErrorsCount

Docx4j contains a class JaxbValidationEventHandler, which is responsible for handling unexpected content (both mc:AlternateContent which is common, and certain other errors in an incoming docx).

In the JAXB reference implementation, there is a method shouldErrorBeReported(); see https://github.com/javaee/jaxb-v2/blob/master/jaxb-ri/runtime/impl/src/main/java/com/sun/xml/bind/v2/runtime/unmarshaller/UnmarshallingContext.java#L1350

Previously errors (ie unexpected content) were not ignored if UnmarshallingContext.getInstance().parent.hasEventHandler()

Some time around 2015, JAXB was changed so that after unexpected content has been encountered 10 times (ie in 10 docx parts), the error won’t be reported (ie docx4j’s JaxbValidationEventHandler won’t be invoked, so docx4j doesn’t have the opportunity to deal with the content error, with the result that content is silently dropped).

Recent versions of docx4j work around this, by resetting the error counter, and docx4j 3.3.7 builds on this with an important fix for errorsCount where XLXP2 is in use with fallback JAXBContext of Sun/Oracle or reference implementation

Test Results

With environment WebSphere 9.0.0.4, current docx4j/Plutext releases work well.

With environment: WebSphere 8.5.5.13 (WebSphere 8.5.5.9 upgraded in order to run IBM Java 8),  current docx4j/Plutext releases work well.

(Older Java should also be ok, but was outside the scope of testing)

Methodology Notes

In testing, there are several things to be aware of:

  1. WebSphere might re-use a jar in multiple webapps. In case of unexpected results, ensure you don’t have different versions of the same jar in other webapps, stop the server, clearClassCache, and restart.
  2. If you are looking for JaxbValidationEventHandler log entries but cannot see them, double check that your jar files do not contain another log4j.xml.

Java 2 Security

If you have Java 2 Security enabled in WebSphere, you will need certain permissions enabled in policy settings.

PDF Converter task sizing and auto scaling

March 15th, 2018 by Jason

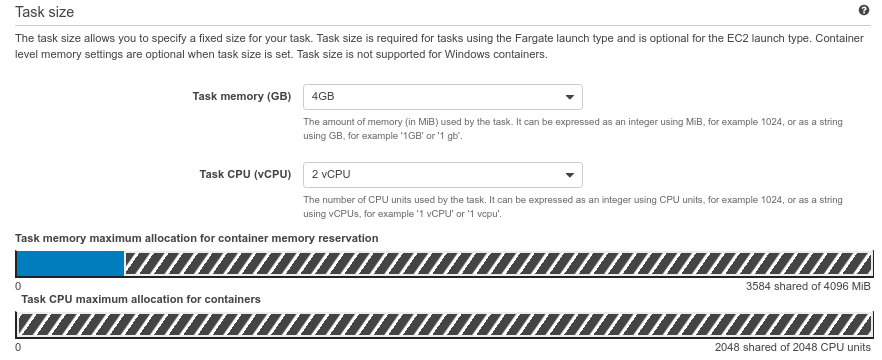
With FarGate, you have to specify a task size:

task-sizing

Load testing with JMeter, I have found that 2 vCPU works well for the Task CPU setting.  The minimum Task Memory you can set for 2 vCPU’s is 4GB.  (The PDF Converter doesn’t use that much RAM, so it would be good to be able to specify just 1GB, particularly since FarGate pricing includes a cost per GB)

For my load testing (32 parallel conversions), served by 2 tasks:

JMeter_2-tasks

So, an average of 9.8 sec per conversion (based on a range of documents, some short/quick, others long/slow).

With FarGate, you can set a service to auto-scale, under CPU load or based on incoming requests.

So let’s improve on those response times, by auto-scaling the number of tasks available for processing the incoming PDFs.

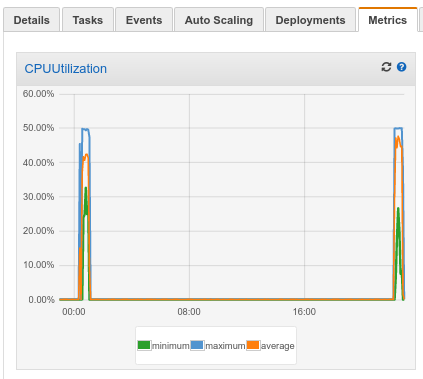
How to do this? FarGate tells me my CPU utilization was:

UtilizationCPU

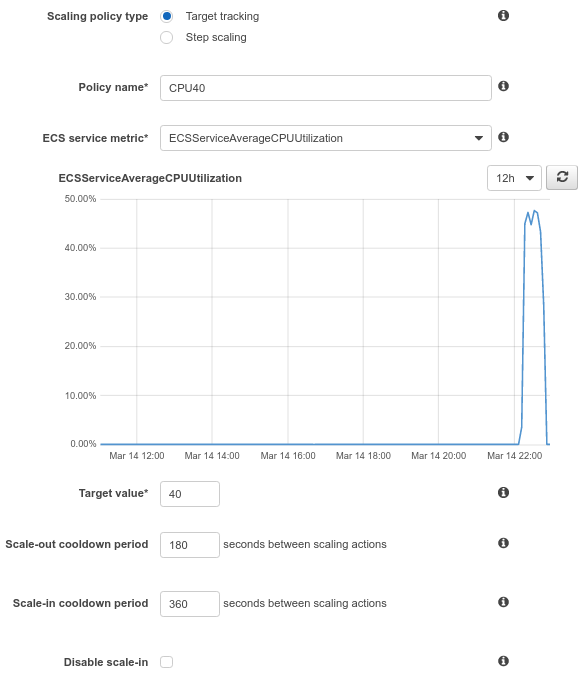
So let’s “update” the service to set auto-scaling to happen at 40%:

auto-scaling-cpu40

Re-running the load test, here are the results:

JMeter_autoscaled

You can see the response time better than halved, and throughput doubled.

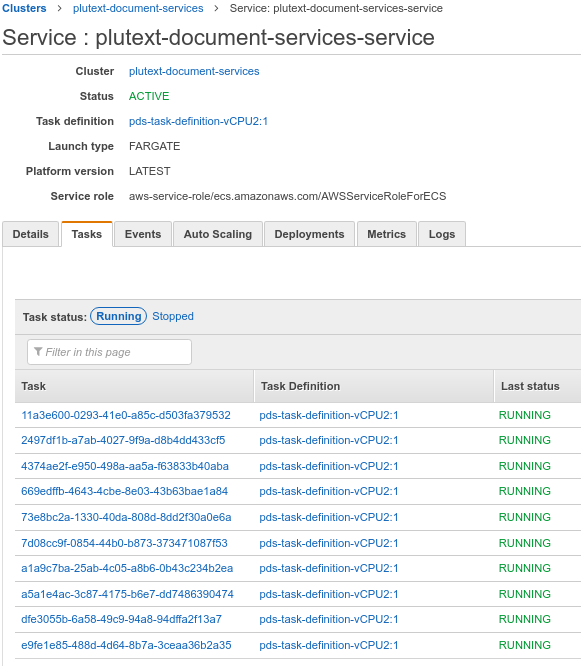
At the end of the test, I can see that it auto-scaled to 10 tasks:

tasks-status-scaled-cpu40

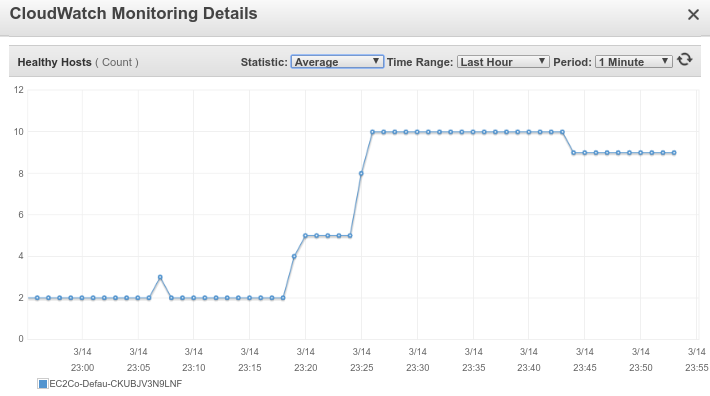
Looking at the load balancer target group, you can see it went from 2 tasks to 5 tasks to 10:

healthy hosts

(the test sarted at 23:13 and finished at 11:28; scaling in occurred some time after the test concluded).

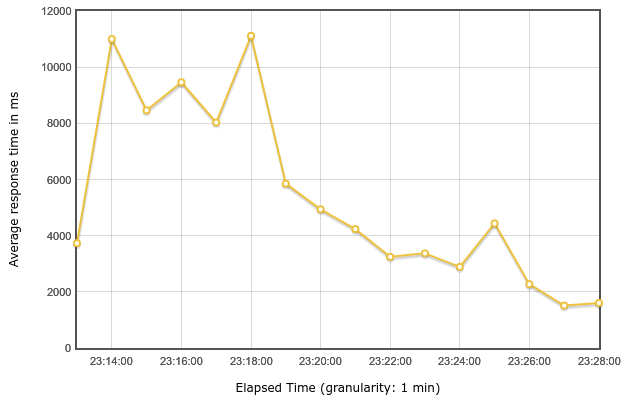
You can see from the graph below that the average response times drop as these extra tasks become available.

response-times-over-time

Running the load test one last time, with 8 tasks in place from the start:

JMeter_10-tasks

we have an average response time of 2.2 seconds, and we’re converting 12.48 documents per second.

In summary, configuring the cluster so that each task has 2 vCPUs, and auto-scaling when CPU utilization hits 40%, looks like a good place to start tweaking your own instance.

Using HTTPS on FarGate

March 12th, 2018 by Jason

This is the second post in a series on scaling the PDF Converter using Amazon’s FarGate service.

In the first post, we got the PDF Converter running across 2 instances behind a load balancer, in under 20 minutes.

Now, we want to use HTTPS.  The Amazon documentation is at https://docs.aws.amazon.com/elasticloadbalancing/latest/application/create-https-listener.html

First, go to the AWS Certificate Manager (ACM): https://console.aws.amazon.com/acm/home?region=us-east-1#/firstrun/ to request a certificate (for your domain).

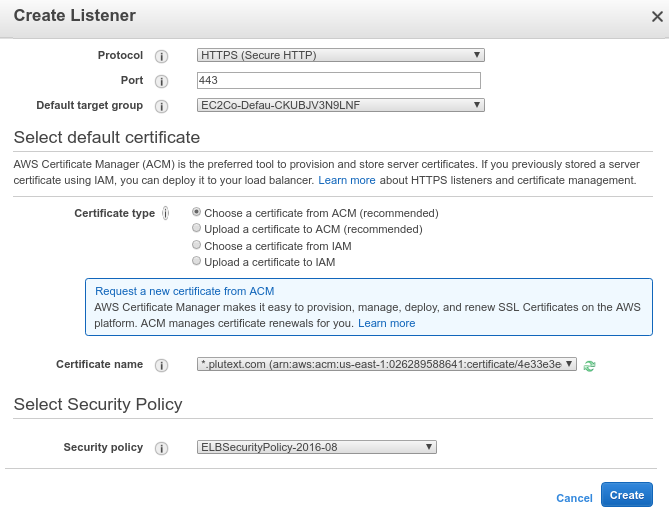
Now go to your load balancer, and choose “create listener“. Choose HTTPS.  You should see something like:

alb-https-listener

(here I’ve used plutext.com, but obviously you’ll have substituted your own domain).

If/when you click “create”, you’ll probably get a warning saying your security group doesn’t allow HTTPS, so click on the security group to allow traffic on port 443.

We’re not quite there yet.  If you try converting using your load balancer endpoint (something like https://EC2Co-EcsEl-1GY7BNHSDU1HTH-1150934046.us-east-1.elb.amazonaws.com:443), you’ll get an error saying the certificate subject name does not match target host name.

To overcome this, you need to update your DNS records so you have a host with the right name resolving to the load balancer.

The recommended way to do this is to use Amazon’s Route53 DNS.

But just to prove what we’ve done so far works, its enough to put an entry in your /etc/hosts file mapping a host covered by your certificate, to the load balancer’s IP address.  Then:

$ curl -v -X POST --data-binary @HelloWorld.docx -o out.pdf https://fargate.plutext.com:443/v1/00
000000-0000-0000-0000-000000000000/convert
Note: Unnecessary use of -X or --request, POST is already inferred.
% Total    % Received % Xferd  Average Speed   Time    Time     Time  Current
Dload  Upload   Total   Spent    Left  Speed
0     0    0     0    0     0      0      0 --:--:-- --:--:-- --:--:--     0*   Trying 54.89.45.53...
* Connected to fargate.plutext.com (54.89.45.53) port 443 (#0)
* found 148 certificates in /etc/ssl/certs/ca-certificates.crt
* found 597 certificates in /etc/ssl/certs
* ALPN, offering http/1.1
0     0    0     0    0     0      0      0 --:--:-- --:--:-- --:--:--     0* SSL connection using TLS1.2 / ECDHE_RSA_AES_128_GCM_SHA256
*        server certificate verification OK
*        server certificate status verification SKIPPED
*        common name: *.plutext.com (matched)
*        server certificate expiration date OK
*        server certificate activation date OK
*        certificate public key: RSA
*        certificate version: #3
*        subject: CN=*.plutext.com
*        start date: Mon, 12 Mar 2018 00:00:00 GMT
*        expire date: Fri, 12 Apr 2019 12:00:00 GMT
*        issuer: C=US,O=Amazon,OU=Server CA 1B,CN=Amazon
*        compression: NULL
* ALPN, server accepted to use http/1.1
> POST /v1/00000000-0000-0000-0000-000000000000/convert HTTP/1.1
> Host: fargate.plutext.com
> User-Agent: curl/7.47.0
> Accept: */*
> Content-Length: 4082
> Content-Type: application/x-www-form-urlencoded
> Expect: 100-continue
>
< HTTP/1.1 100 Continue
0  4082    0     0    0     0      0      0 --:--:--  0:00:01 --:--:--     0} [4082 bytes data]
* We are completely uploaded and fine
< HTTP/1.1 200 OK
< Date: Mon, 12 Mar 2018 05:01:52 GMT
< Content-Type: application/pdf
< Content-Length: 38507
< Connection: keep-alive
< access-control-allow-origin: *
<
{ [16384 bytes data]
100 42589  100 38507  100  4082  16903   1791  0:00:02  0:00:02 --:--:-- 16903
* Connection #0 to host fargate.plutext.com left intact

Now we know it works, you can add a CNAME record at your DNS provider, mapping your chosen host name to the load balancer’s host name.

Remove the entry we added to /etc/hosts, give your CNAME entry time to propogate, then verify the curl command works.

Scaling the PDF Converter with AWS Fargate

March 12th, 2018 by Jason

This is a walkthrough of deploying the PDF Converter on Amazon’s FarGate.

What is Fargate?  New since November 2017,  its an easy way of deploying containers on AWS ECS.  You don’t have to manage the underlying EC2 instances, and the wizard takes care of the setup, so you can be up and running in less than 20 mins!

With FarGate, you make a “cluster” which you can easily size to suit a known conversion volume, or have it auto-scale with load.  Largely thanks to Docker!

This walkthrough assumes you already have an AWS login.

To getting things working:

  1. there’s 4 steps in Amazon’s firstRun wizard: https://console.aws.amazon.com/ecs/home?region=us-east-1#/firstRun
  2. then you configure the health check path

But first, check things are configured correctly for ECS in your Amazon account.  Since FarGate currently only works in N.Virginia, visit https://console.aws.amazon.com/ecs/home?region=us-east-1#/getStarted

ECS FirstRun Wizard

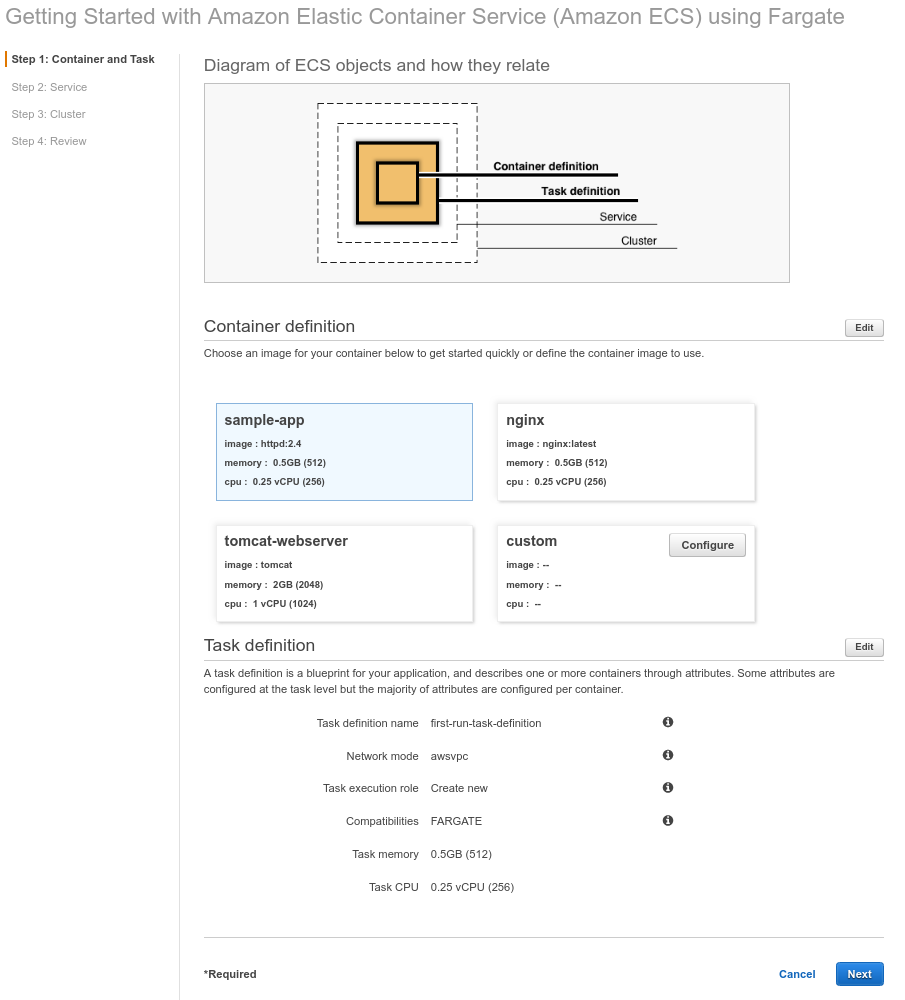
If you don’t already see the “Getting Started” wizard pictured below, click https://console.aws.amazon.com/ecs/home?region=us-east-1#/firstRun (this is easier than “create new cluster” at https://console.aws.amazon.com/ecs/home?region=us-east-1#/clusters/create/new since it also creates a Service and Task, but more importantly, your load balancer).

fargate-firstrun-step1

In the “Container definition” section, click the “configure” button on the “custom” image.

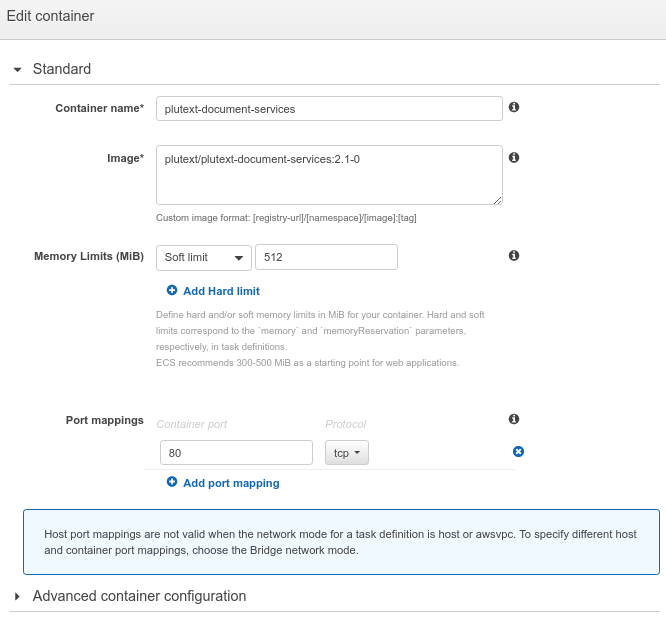
Type the following in image: plutext/plutext-document-services:2.1-0, and set the other values as per the image below:


container-settings-dockerhub

Next, in “Task definition”, edit the task definition name, to say: pds-task-definition

Click next.

Service

On the “service” screen, click “edit” to set the number of tasks to 2, and choose “Application Load Balancer”.service

Click next.

Cluster

On this screen, just change the cluster name to: plutext-document-services

When you click next, the review screen should show:

review

Click “Create”.  The wizard will perform various tasks; it might take 3 or 4 mins.

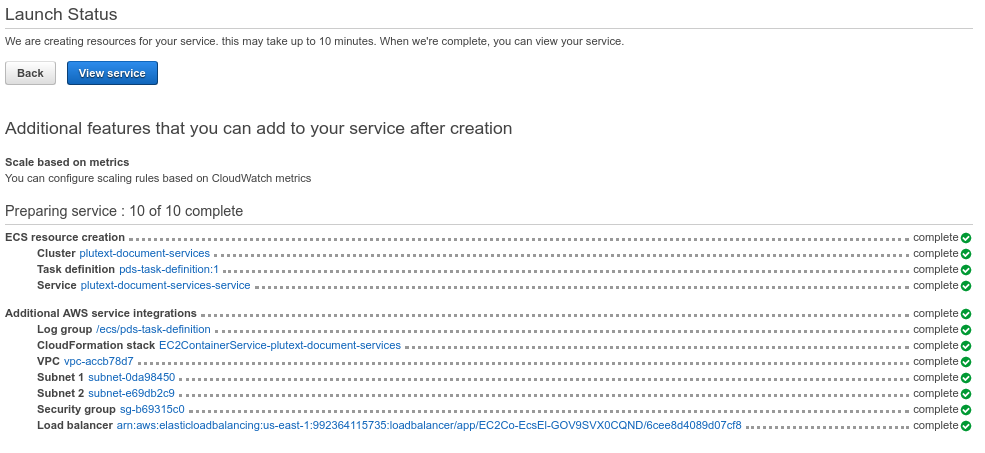
When it is done, you should see:

preparing-service

Click the “view service” button.

Health Check

You need to set the health check path in your load balancer.  (Unfortunately, FarGate currently doesn’t populate this from the HEALTHCHECK statement in your Dockerfile)

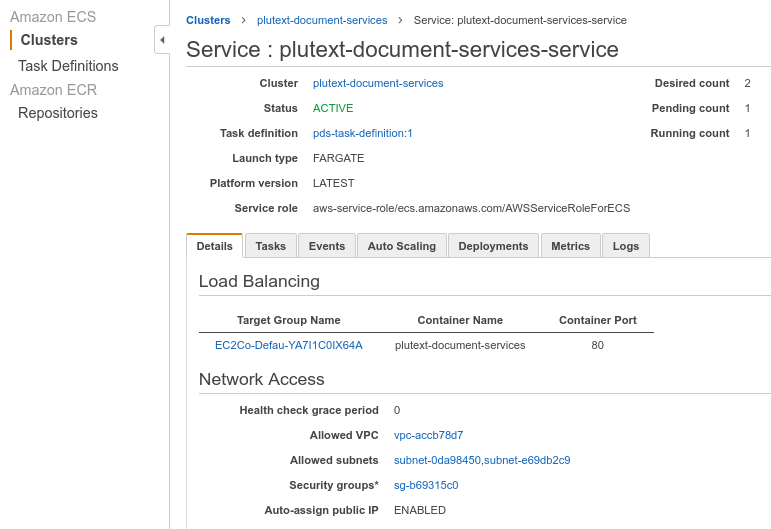
So in your cluster, click your service, where you’ll see the load balancer target group:

cluster-service


Click that.

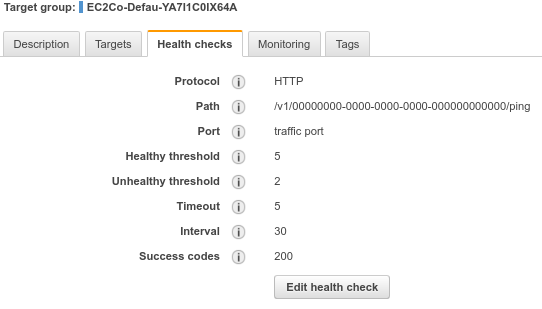
Now, you’re in your load balancer, where you can click “edit health check” and enter path:  /v1/00000000-0000-0000-0000-000000000000/ping

Result should be:

health-check

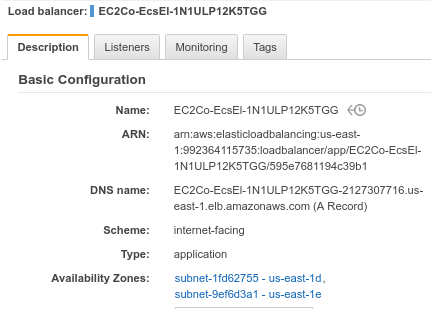
Before you go back to your service, click on the load balancer itself, and make a note of its DNS name.   You’ll see the host name there in the basic configuration:

alb-hostname


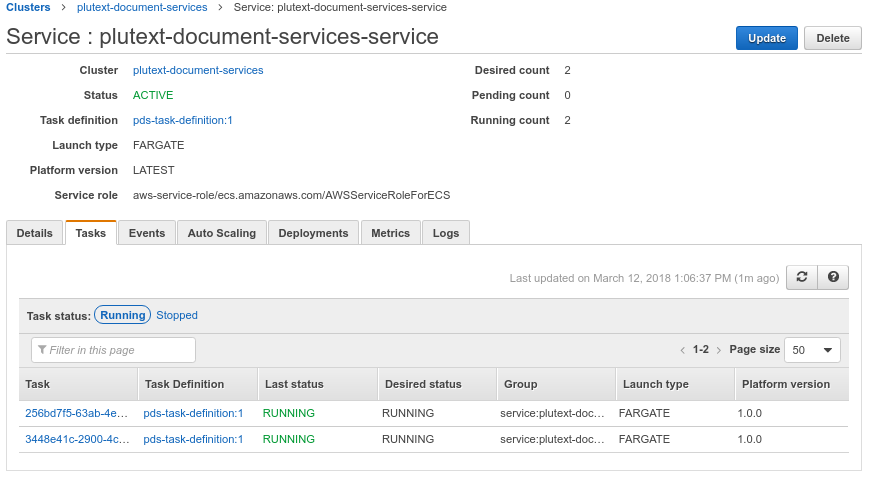
Now if you go back to your service, on the “tasks” tab, you should see:

tasks-status

ie “RUNNING”

Try it out!

To convert a document, you need the DNS host name of the load balancer you made a note of above.  Now you can test with something like:

curl -v -X POST –data-binary @HelloWorld.docx -o out.pdf http://EC2Co-EcsEl-1N1ULP12K5TGG-2127307716.us-east-1.elb.amazonaws.com:80/v1/00000000-0000-0000-0000-000000000000/convert

Check for “200 OK” and try opening out.pdf.

Next steps

In our next post, we’ll configure HTTPS, and in the one after that, we’ll add a license key.